Anti-squat
When a vehicle accelerates, weight is transferred to the rear, making the suspension “squat” from the extra weight. This chassis movement can be minimized or completely eliminated by using geometry to negate the squatting effect. On any rear suspension system (assuming it is a full forward system, even a 2 link) by moving the IC higher will have a higher percentage (the measurement given to anti squat) of anti squat making for a vehicle that doesn’t squat as much during acceleration and a lower IC will have a lower percentage and will squat more. Going overboard and running the bars high in the front in order to negate any squat will induce excessive roll over steer making the vehicle less stable while cornering. There is a fine balance that needs to be made when designing the “perfect” system. It is not so important to calculate out anti squat for a daily driver, but more important that you understand that it exists.
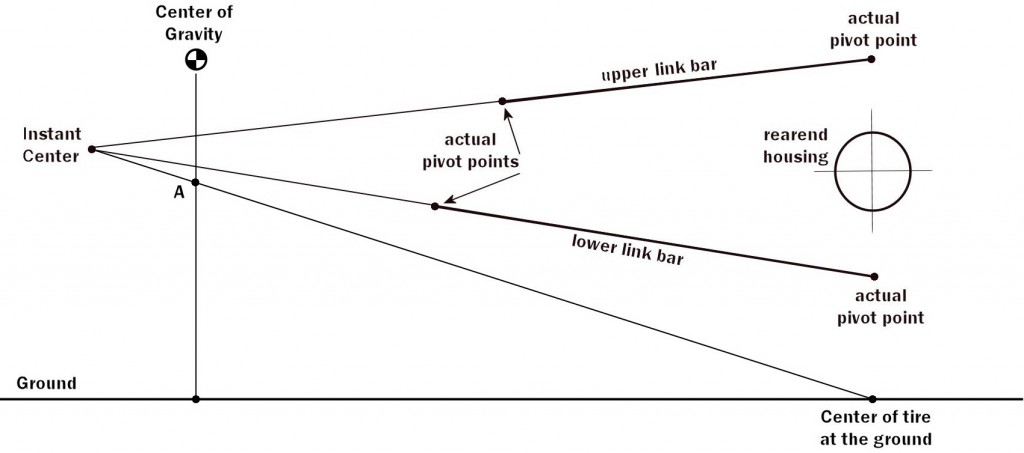
In this side view of the rear suspension, you cannot tell if there are 3 or 4 bars or how the bars are oriented. The instant center is found by extending the lines through the pivot points until they intersect. From there, anti squat is found by drawing a line from the IC to the center of the tire at the ground. Where that line crosses the center of gravity line it creates our measuring point ‘A’. The percentage of the line from the ground to our intersect point is the percentage of anti squat.
How do you figure out were your center of gravity is without wheel scales
2 ways I can think of. The first way is to kind of ballpark it, knowing that a front engine, front drive setup usually has a 70/30 front to rear weight bias, a front engine, rear drive setup is usually in the 60/40 range, and a rear-mid engine, rear drive setup is usually about 45/55 percent front to rear. Rear engine, rear drive will usually get you 40/60. All wheel drive or 4×4 will skew these numbers of course. Vertically, it is usually located 3-6 inches above the center of the crank shaft, or where the camshaft is located on a chevy small block v8.
The second method is to get some graph paper, a tire gauge, and do some math. Jackup each tire one by one. Put a piece of graph paper under each one, and set it back down. The tire’s contact patch will mark the paper. Figure out the number of square inches of the contact patch for each tire (do not count the voids between the treads). Then, multiply the number of psi of air in each tire by the number of square inches of contact patch, and you have the weight of that corner of the car. For instance, 35 pound of pressure per square inch X 20 square inches of contact patch = 700 pounds of weight on that corner…